It’s important to use the right method when installing roofing shingles to protect your home from leaks, wind, and other weather damage. Roofers often think that all they do is put down shingles, but how they are nailed down is very important for how well they work and how long they last. With proper placement, the right tools, and careful installation, your roof will stay stronger and last longer. Choose the best roofing and exteriors based on what professionals say. This will help you in the long run.
Steps to Nail Roofing Shingles for Best Performance
Here’s a step-by-step process to nail roofing shingles:
Step 1: Prepare the Roof Deck
Make sure the roof deck is clean, dry, and cleared of old nails and debris. Spread the roofing underlayment out evenly to keep out even more water. Shingles are more likely to remain flat and in place on a smooth surface. If you take the time to prepare the deck correctly, the shingles will be level, and there won’t be any more leaks. Damage could happen to the new shingles if the surface is rough or if old nails stick out.
Step 2: Align the Starter Course
The starting course is the name for the first row of shingles. To make a straight base, put it along the roof’s edge. If you line up the shingles correctly, the rest will follow the same line and look neat. If the first row of boards isn’t straight, the rest of them will look off and might not fit right.
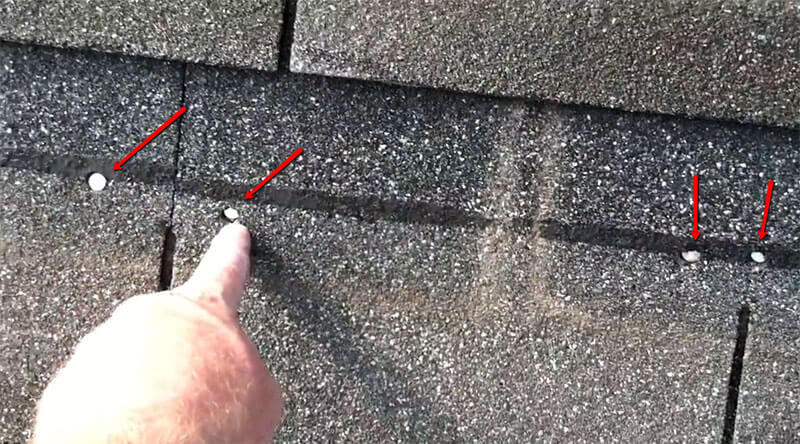
Step 3: Place Nails in the Right Spot
The builder drew a line or strip for nailing on each shingle. Always put your nail inside this strip. Most places use four nails per shingle, but places with a lot of wind should use six nails. The strongest staying power is found in this position. If you nail outside the strip, the shingle is more likely to lift or split.
Step 4: Drive Nails at the Correct Angle
The nails should be pushed against the shingle in a straight line. Do not leave them sticking up above the shingle surface or drive them in at an angle. A nail that goes too deep could damage the shingle, and if it’s not deep enough, it might not hold it in place. When you use the right amount of pressure, the shingles stay in place without coming off. Change the settings on the nail gun so that it doesn’t drive too many nails.
Step 5: Space Nails Evenly
Make sure the nails are evenly spread so that the pressure on the shingle stays the same. If the spacing isn’t even, it can create weak spots where wind or water can enter. Things stay strong and balanced when you stick to a plan. That’s one way to look at the nails: they hold the shingles in place. When the shingles are spaced evenly, their weight is spread out fairly.
Step 6: Overlap Shingles Correctly
Each new row of shingles should cover the ones below it. Overlapping the nails from the row below keeps them dry and out of the wind and rain. When the overlaps are done right, the roof also looks neat and even. If the gap isn’t big enough, water can get through and cause leaks. On the other hand, shingles are useless and heavy when they meet too much.
Step 7: Inspect as You Go
Take a look at your work every few rows. Check that the lines are straight, the nails are in the right place, and the connection is strong. When you fix small problems early, they don’t get worse later. Fixing one row takes less time than an entire section, so regular checks will save you time in the long run. Finding problems right away makes the roof stronger and lasts longer.
Conclusion
When you nail roofing shingles, it’s not just about how they look; it’s also about how strong, safe, and long-lasting they are. Every step is important, from getting the roof deck ready to verifying the overlap and nail placement. By following simple steps, you can avoid leaks or damaged shingles. To get the greatest results, think about employing specialists who know a lot about the best roofing and exteriors to ensure your roof is properly installed and secured.